Please note that the page on the construction of the thermal store ends showing the non-insulated cylinder. It was obviously not left in this condition!
As we already had rolls of glass fibre which were used to insulate the roof of the barn, I used strips of these and simply wrapped them around the thermal store, using baling twine to keep them in place. The photo below shows the result. And see if you can spot the mistake!
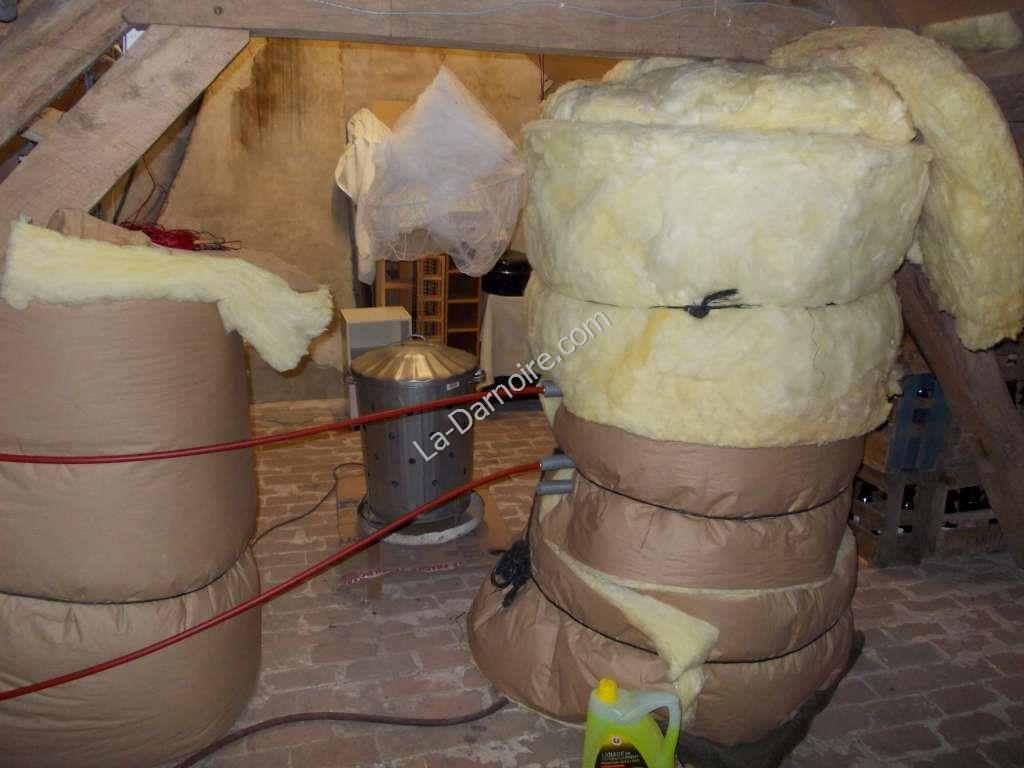
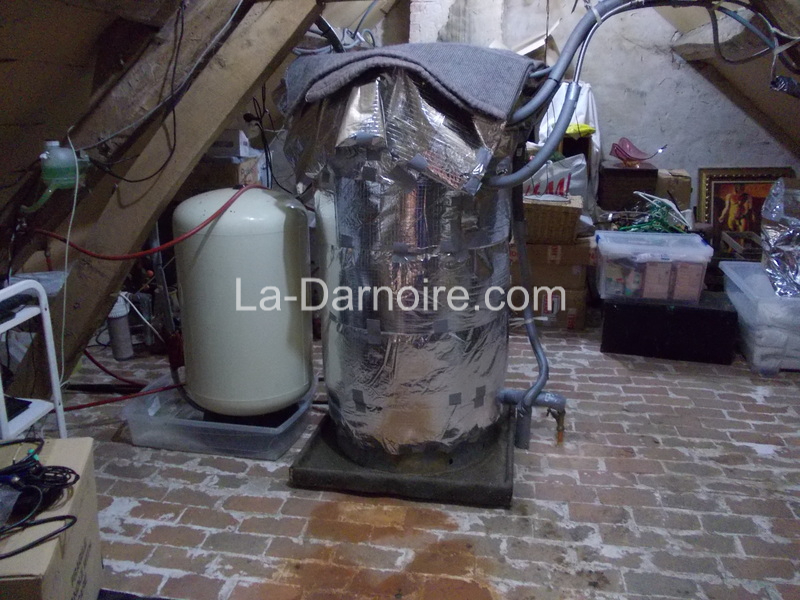
The thermal store is the wrapped object on the right; the other wrapped bundle on the left is the cold water cylinder. The red pipes coming out of the thermal store are for the central heating; more on this later.
As previously mentioned, this entire system was built from scratch; I was not an expert in green heating technologies. So despite a lot of research, mistakes were made.
The original galvanized lid proved useless, as not only was it letting too much heat escape, but water was condensing on the underside and dripping over the rim of the tank onto the glass fibre insulation. I made a new lid by using my router to cut a large diameter circle out of some 18mm plywood. I then painted the underside with some bituminous roofing paint which I had left over from the repair of a flat roof to our house in Reading. An ordinary garden hosepipe was then cut in half lengthways and placed over the rim of the tank, the plywood was then placed on top of this, and the whole thing was compressed and held in place by an old car scissor jack. The thermal store is under a main roofing beam which provides a suitable stop for the top of the jack. You can't see the jack in the photo as it's surrounded with glass fibre.
Update, 2015:
Although the bituminous roofing paint held up fine, the plywood started to disintegrate due to the humidity. The aged FIL had quite a few old metal traffic signs, left over from when he sub-contracted to the local Public Works Department. It turned out that one of these (suitably lined with some insulating rubber) fitted the requirements for a new lid, eliminating the need for the scissor jack at the same time.
On average, the thermal store was losing 5 °C overnight, and we spent eight months without giving it another thought.
However, don't think this all went swimmingly. If you didn't spot the mistake in the photo above, I'll explain. In January 2014 we suddenly noticed a discoloured patch on the lounge ceiling. Hastily I went outside to enter the barn, and on the way I noticed water running out of the overflow hosepipe for the thermal store. This did not bode well.
I'm not an expert in using oxy-acetylene equipment, especially when it comes to joining brass to galvanized iron. It transpired that the leak was coming from the join between the tank and the brass compression fitting for the hot water outlet. Fortunately, I had some J-B WaterWeld Epoxy Putty in my workshop. This is quite amazing stuff for sealing leaks because the surfaces do not have to be dry. However, I decided to drain the thermal store down to the level of the leak so that I could clean the area thoroughly.
That took care of the leak. The mistake I'd made was in insulating the tank all the way to the floor with glass fibre. The water had leaked into the drip tray, and the capillary action of the glass fibre had done an excellent job of moving the water out of the drip tray and onto the floor, where it was able to run across and through the ceiling.
I removed all the glass fibre and instead wrapped the entire thermal store with two layers of bubble wrap, followed by aluminium foil (shiny side inwards), topped off by another two layers of bubble wrap.
I had also originally added 2.5 litres of Fernox F1 Central Heating Protector to the water in the system instead of using propylene glycol. Well, I'm afraid it did not appear to have been much use. The water in the thermal store was not only rust-coloured, but the inside walls are rusty too. I'm keeping my eyes open for a cheap (or preferably free!) stainless steel tank for a future replacement. *
We weren't out of the woods yet though. That evening, we were congratulating ourselves on the newly insulated thermal store, when I noticed that the water temperature was not rising as quickly as it usually did. Going outside, I found the overflow pipe dripping. Again! I had installed a toilet cistern-type valve for filling the thermal store, and maintaining the water level to compensate for any evaporative losses. The valve had developed a fault, and was still supplying water to the tank even though the polystyrene float was under water! The feed for this valve was thus turned off. I have since replaced this polystyrene float and toilet valve with an old brass one salvaged from the aged FIL's workshop. However I still check the level of water in the thermal store manually on a regular basis.
Although bubble wrap and aluminium foil is supposedly very efficient insulation, we found that the thermal store was now losing around 11 °C overnight. Going to bed at 10 pm, the temperature was 60.2 °C. At 08:00 the following morning: 49.6 °C. We thus re-used most of the original glass fibre (the pieces which had not become wet!), and wrapped these around the outermost layer of bubble wrap, this time being careful not to go down as far as the drip tray. It certainly made the thermal store heat up more quickly, and the overnight heat losses are once again in the region of 5 °C.
Update, 2016:
I have since installed a 12V high water level alarm in the drip tray, linked to a flashing LED light on the control panel.
* Update, 2020:
In 2016 I purchased some "Outdoor boiler stove anti-corrosion" liquid from the US and added it to the thermal store. This stuff worked much better than the Fernox; in fact the water in the thermal store is still clear.
Update, 2021:
The good news was that the "leak detector" alarm and LED light on the control panel worked. The bad news was that the thermal store had, indeed, developed a leak. Nothing major, but it needed to be investigated. There was no choice but to remove all the glass-fibre insulation, drain the tank completely and have a look. I discovered a small pin-hole in the very bottom of the tank. I enlarged the hole with a drill, and inserted a bolt with two rubber washers (cut from an old tractor tyre tube) sandwiched between two galvanized steel washers. I then painted the entire bottom of the tank, inside and out, with a resin-based waterproofing sealant. Once this had dried, and before re-filling, I decided to relocate the tank slightly to the left in order to improve access to the area behind the tank. The thermal store insulation was improved at the same time. I glued on strips of expanded polystyrene foam:

This created an air gap between the tank, and the strips of 14-layer polyethylene/foil insulation roll, held in place by duct tape (this later proved ineffective so some string was added, wrapping around the entire tank in a spiral.)